Author: Sean Thayne

Insane(ly Good) Developer at Skyseek

Flex 4.12 Release, and new installer around the corner…

Congrats to the Apache Flex Team, today they release Flex 4.12. Apache Flex 4.12.0 is a update to Apache Flex 4.11.0 that adds support for the latest Flash Player and AIR runtimes, improved memory and performance, improved mobile skins and iOS7 support and over 80 bug fixes.They also have some big improvements coming soon to their SDK installer. Version 3.0, which will be release in the next couple of weeks, will include two major enhancements.

First off, the new installer will pretty much be a Air GUI that wraps a Ant scripts. The important enhancement this entails is for Linux users, we can know use the SDK installer to quickly grab the latest and great SDKs and get them running.

Secondly, the new installer will also include the ability to quickly install FlexJS. FlexJS is a port of Flex that allows Flex apps to compile to JavaScript and run without the Flash run time. The Apache team is leveraging every diversification they can. And future proofing Flex.

Exciting stuff, congrats guys

Unemployment Rate: Democrat vs Republican

Here is a list of all the increases and decreases. I compiled them by term.

D-Obama 2nd Term (so far): Decreased by 0.1
D-Obama 1st Term: Decreased by 0.6
R-Bush 2nd term: Increased by 2.9
R-Bush 1st term: Increased by 1.2
D-Clinton 2nd term: Decreased by 1.0
D-Clinton 1st term: Decreased by 1.9
R-Bush Sr: Increased by 1.9
R-Reagan 2nd term: Decreased by 2.0
R-Reagan 1st term: Decreased by 0.2
D-Carter: Decreased by 0.2
R-Ford (partial): Increased by 2.1
R-Nixon (partial) 2nd term: Increased 0.5
R-Nixon 1st term: Increased 1.6
D-Johnson 2nd term: Decreased by 1.7
D-Johnson (partial) 1st term: Decreased by 0.4
D-Kennedy (partial): Decreased by 1.4
R-Eisenhower 2nd term: Increased by 3.0
R-Eisenhower 1st term: Increased by 1.3
D-Truman 2nd term: Decreased by 2.1
D-Truman** 1st term: Decreased by 1.1

Democrats have dropped the unemployment percent by 9.9% since 1948. Also interestingly never leaving a increase. Even poor Kennedy left things better in his short time as president.

Republicans aren’t so lucky. Reagan is the only one who left office with better numbers. Dropping the percentage by a impressive 2.2 points. The rest post a combined negative 14.5 points. Leaving the net Republican total to -12.3 points.

3 Best terms in the last 60 years.
#1: D-Truman (-2.1)
#2: R-Reagan (-2.0)
#3: D-Clinton (-1.9)

3 Worst terms in the last 60 years.
#1: R-Eisenhower (+3.0)
#2: R-Bush (+2.9)
#3: R-Ford (+2.1)

3 Worst (all terms combined)
#1: R-Eisenhower (+4.3)
#2: R-Bush (+4.1)
#3: R-Nixon (+2.1)

** Labor Force Statistics only had data for 1948+. Truman’s first term started in 1945.

AS3 Warning Fix: 1102, null used where a Number value was expected.

This is a common warning issue. When trying to reset a number back to a default, null, or empty value. You think that you can just set the variable to Null. AS3 handles numbers oddly thou.

var foo:Number;

public function resetFoo():void {
    foo = null;
}

This code will produce the following warning during/after builds.

1102: null used where a Number value was expected.

The correct way to reset a Number is to set it to NaN “Not a Number”.

var foo:Number;

public function resetFoo():void {
    foo = NaN;
}

This will remove the warning.

Zend Module Layout/Error Plugin

When working with modules in Zend Framework. You might want to separate out your admin’s layout from your user’s front end layout. And you might also want to have different error handling screens for those as well.

With the help of Daniel Cousineau’s Blog Post I was able to come up with the following Layout Plugin.


/**
 * Module Layout Plugin
 *
 * @author     Sean Thayne <sean@skyseek.com> http://www.skyseek.com
 * @author     Daniel Cousineau <dcousineau@gmail.com> http://www.toosweettobesour.com/ 
 */
class App_Layout_Plugin extends Zend_Layout_Controller_Plugin_Layout 
{
	public function preDispatch(Zend_Controller_Request_Abstract $request) 
	{
		$this->_setLayoutPath($request);
		$this->_setErrorController($request);
	}

	protected function _setLayoutPath(Zend_Controller_Request_Abstract $request)
	{
		$layoutPath  = APPLICATION_PATH;
		$layoutPath .= DIRECTORY_SEPARATOR . "modules";
		$layoutPath .= DIRECTORY_SEPARATOR . $request->getModuleName();
		$layoutPath .= DIRECTORY_SEPARATOR . "layouts";
		$layoutPath .= DIRECTORY_SEPARATOR . "scripts";

		Zend_Layout::getMvcInstance()->setLayoutPath($layoutPath);
	}

	protected function _setErrorController(Zend_Controller_Request_Abstract $request)
	{
		$front = Zend_Controller_Front::getInstance();

		//If the ErrorHandler plugin is not registered, bail out
		if( !($front->getPlugin('Zend_Controller_Plugin_ErrorHandler') instanceOf Zend_Controller_Plugin_ErrorHandler) )
			return;

		$error = $front->getPlugin('Zend_Controller_Plugin_ErrorHandler');

		//Generate a test request to use to determine if the error controller in our module exists
		$testRequest = new Zend_Controller_Request_HTTP();
		$testRequest->setModuleName($request->getModuleName())
					->setControllerName($error->getErrorHandlerController())
					->setActionName($error->getErrorHandlerAction());
					
		//Does the controller even exist?  
		if( $front->getDispatcher()->isDispatchable($testRequest) )
		{
			$error->setErrorHandlerModule($request->getModuleName());
		}
	}
}

You use the plugin pretty simply by modifying your Bootstrap to include a _initLayout method like so.

class Bootstrap extends Zend_Application_Bootstrap_Bootstrap {

	protected function _initLayout() {
		Zend_Layout::startMvc(array(
			'pluginClass' => 'App_Layout_Plugin'
		));
	}

}

Sublime Text 2 – Execute MySQL Query

This is a little hack to allow you to execute your SQL scripts into your mysql client.

In Sublime Text 2. Go under Tools -> Build System -> New Build System.

Enter in the following.

{
	"cmd": ["mysql", "-u", "root", "-e", "source $file"],
	"selector": "source.sql"
}

tweak it however you need. Save it. Then just open up any sql file and use Ctrl+B to run the sql. Don’t forget to add the “use myCoolDataBaseName” at the top of your sql scripts.

Quick and Easy FTP Proxy using SSH

I’ve been having trouble connection to a few of my clients FTP servers while I’ve been freelancing in China. So I looked around for a simple way to proxy my FTP connections. If you have a linux/mac server you can proxy through it. I used my Free Amazon EC2 Server.

All you need to do is run this on your local box.

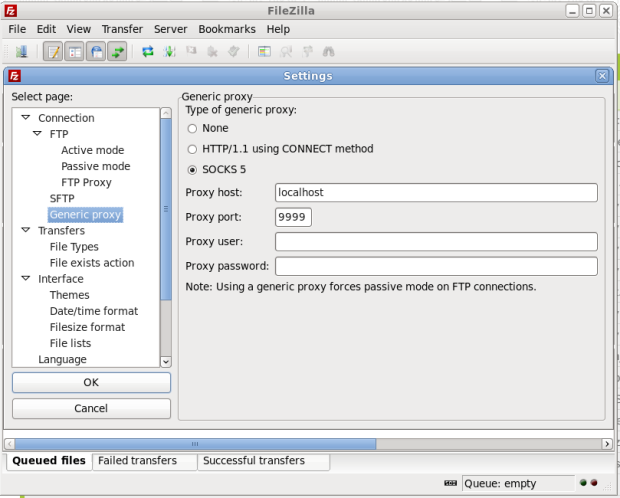
 ssh -D 9999 ##HOSTNAME##

Then in ftp client instruct it to use a SOCK5 server

It’s that easy!

Btw, you can do this on windows almost as easy, you just need to use Putty for the ssh command part. Checkout this nice blog post from Chris Swan for information about using Putty.

http://blog.thestateofme.com/2010/10/27/using-amazon-ec2-as-a-web-proxy/

Simple FXG Path Viewer

<?xml version="1.0" encoding="utf-8"?>
<s:WindowedApplication xmlns:fx="http://ns.adobe.com/mxml/2009"
					   xmlns:s="library://ns.adobe.com/flex/spark"
					   xmlns:mx="library://ns.adobe.com/flex/mx">
	<fx:Script>
		<![CDATA[
			import mx.graphics.SolidColor;

			import spark.primitives.Path;

			public var color:uint = 0xFF0000;
			public var path:Path;

			protected function updatePath(changeColor:Boolean=false):void
			{
				if(changeColor)
					color=Math.random()*16777215;

				path = new Path();
				path.percentWidth = path.percentHeight = sizeCheck.selected ? Number.NaN : 100;
				path.data = dataTextArea.text;
				path.fill=new SolidColor(color);

				pathGroup.removeAllElements();
				pathGroup.addElement(path);
			}

		]]>
	</fx:Script>
	<s:VGroup horizontalAlign="right" bottom="10" left="10" top="10" right="10">
		<s:Group id="pathGroup" width="100%" height="100%" click="updatePath(true)" />
		<s:CheckBox label="Actual Size" selected="true" click="updatePath()" id="sizeCheck" />
		<s:TextArea height="100" id="dataTextArea" change="updatePath()" width="100%"/>
	</s:VGroup>
</s:WindowedApplication>

Offset Bézier Curves

Perfect Solution

Short answer it’s impossible to create a perfect offset curve.

The curve at a fixed offset from a given Bézier curve, often called an offset curve (lying “parallel” to the original curve, like the offset between rails in a railroad track), cannot be exactly formed by a Bézier curve (except in some trivial cases). However, there are heuristic methods that usually give an adequate approximation for practical purposes.

-Wikipedia

Imperfect Solution

So here is a heuristic method. Convert the Curve to a poly line spline. Then merge/clip the expanded lines.

  1. Subdivide the Curve into Line Segments
  2. Offset Line Segments
  3. Merge/Clip Intersections

Step #1: Subdivide the Curve into Line Segments

To convert the curve to line segments we use De Casteljau’s algorithm.

public function subDivide( time:Number ):Vector.<CubicBezierCurve>
{
	//Outside Guide Lines
	var outerA:StraightLine = new StraightLine( pointA, controlPointA );
	var outerBridge:StraightLine = new StraightLine( controlPointA, controlPointB );
	var outerB:StraightLine = new StraightLine( controlPointB, pointB );

	//Inner Guide Lines
	var innerA:StraightLine = new StraightLine( outerA.lerp( time ), outerBridge.lerp( time ));
	var innerB:StraightLine = new StraightLine( outerBridge.lerp( time ), outerB.lerp( time ));

	//Point at time
	var newPoint:Point = new StraightLine( innerA.lerp( time ), innerB.lerp( time )).lerp( time );

	//Return Vector
	var newCurves:Vector.<CubicBezierCurve> = new Vector.<CubicBezierCurve>();

	//Left Curve
	var leftCurve:CubicBezierCurve = new CubicBezierCurve();
	leftCurve.pointA = pointA;
	leftCurve.controlPointA = outerA.lerp( time );
	leftCurve.controlPointB = innerA.lerp( time );
	leftCurve.pointB = newPoint;
	newCurves.push( leftCurve );

	//Right Curve
	var rightCurve:CubicBezierCurve = new CubicBezierCurve();
	rightCurve.pointA = newPoint;
	rightCurve.controlPointA = innerB.lerp( time );
	rightCurve.controlPointB = outerB.lerp( time );
	rightCurve.pointB = pointB;
	newCurves.push( rightCurve );

	//Return Vector containing new curves.
	return newCurves;
}

When your flattening a curve some curves need more subdivision than others. You can check the flatness level to determine if the curve needs to be sub divided again and again. This will help optimize your algorithm for offsetting, by breaking the curve into as few of lines as visually required.

Here is a cool method to find flatness of a line.

public function get flatness():Number
{
	var ux:Number = Math.pow( 3 * controlPointA.x - 2 * pointA.x - pointB.x, 2 );
	var uy:Number = Math.pow( 3 * controlPointA.y - 2 * pointA.y - pointB.y, 2 );
	var vx:Number = Math.pow( 3 * controlPointB.x - 2 * pointB.x - pointA.x, 2 );
	var vy:Number = Math.pow( 3 * controlPointB.y - 2 * pointB.y - pointA.y, 2 );

	if( ux < vx )
		ux = vx;

	if( uy < vy )
		uy = vy;

	return ux + uy;
}

This is converted from the great article about curve flattening.
Piecewise_Linear_Approzimation

So now we use these function to subdivide the curve. Here are sample results. This is when using a tolerance of <= 0.15

Original Curve

Subdivided Line Segments (16 lines)

Original Curve

Subdivided Line Segments (26 lines)

Step #2 Offset Line Segments

Next we create parallel lines for each of the lines in our line segment spline.

Offsetting lines is easy and mathematically supported 😉 Here is a sample function.

public function createParrallelLine( difference:Number ):StraightLine {
	var perp_x:Number = -rise
	var perp_y:Number = run;
	var len:Number = Math.sqrt(( perp_x * perp_x ) + ( perp_y * perp_y ));

	perp_x = ( perp_x / len ) * difference;
	perp_y = ( perp_y / len ) * difference;

	var parrallelLine:StraightLine = new StraightLine( new Point( pointA.x - perp_x, pointA.y - perp_y ), new Point( pointB.x - perp_x, pointB.y - perp_y ));

	return parrallelLine;
}

Basically it creates use perpendicular slopes and linear interpolation to create perfectly positioned parallel line. It will also always stay on the correct edge of the curve, as long as the direction of all the lines are the same. Clockwise or Counter-Clockwise.

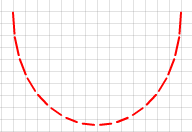
Offset of 1px
Step #3: Merge/Clip

The next step we connect the expanded curve lines, and we determine if the best course of action is to create a new line between them, or if we should remove/cut a existing line.

Check for intersections if your lines intersect, then clip. else create new line between, or if your fancy, you can use another curve, and use the intersection point as the control point.

Examples

I highlighted the intersections with blue. You can see how they mesh nicely.

Final Results

Here is some final results with a 2px offset curve. Original is red, offset is blue.

Related Documents